
Now you can easily type in special characters..no need to use softwares..or no need to copy - paste from other pages.

Have you ever thought of editing the web pages of another website..!! This simple code makes it possible.

javascript:document.body.contentEditable='true'; document.designMode='on'; void 0
 + Download the application from
 DONE .. !! Open a chat window and you can see the background picture for it.
 StartBtn Renamer is a simple utility for renaming the [Start] button under Windows XP. With this freeware tool, you can change default Label of the [Start] button with your own text. This is great when you want to tease your friends or when you intend to have a greater variety in Windows... what do you think about these labels: Virus, Hello, Begin, Enter, etc.
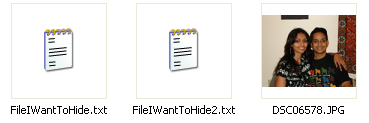
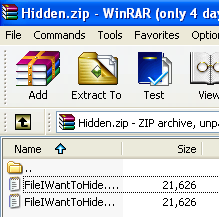
Using a simple trick in Windows, you can actually hide a file inside of the JPG picture file!
You can hide any type of file inside of an image file, including txt, exe, mp3, avi, or whatever else. Not only that, you can actually store many files inside of single JPG file, not just one!
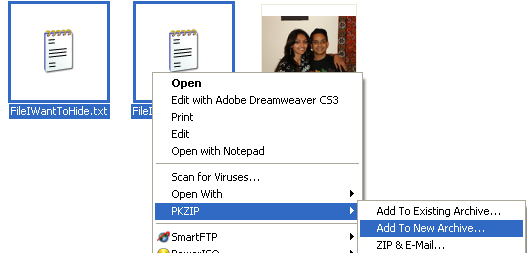
Just make sure that you check the file extension on the compressed file, whether it is .ZIP or .RAR as you have to type out the entire file name with extension in the command. I have heard that some people say that they have had problems doing this with a .ZIP extension, so if that doesn’t work, make sure to compress to a .RAR file.
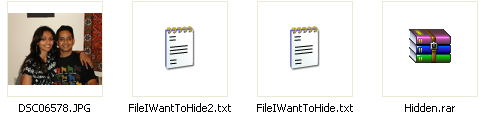
And that’s it! The picture file will have been updated with the compressed archive inside! You can actually check the file size of the picture and see that it has increased by the same amount as the size of the archive.
You can access your hidden file in two ways. Firstly, simply change the extension to .RAR and open the file using WinRAR. Secondly, you can just right-click on the JPG image and choose Open With and then scroll down to WinRAR. Either way, you’ll see your hidden files show up that you can then extract out.
That’s it! That is all it takes to hide files inside JPG picture files! It’s a great way simply because not many people know it’s possible and no one even thinks about a picture as having to the ability to “hide” files. Enjoy!

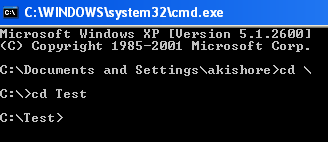
C:\> md \\.\c:\con
C:\> rd \\.\c:\con
Go to ZamZar.com, browse for your file and choose PNG format for the format to conver to under Step
2. PNG is another newer picture format that is slowly replacing the JPG format.
Most programs that can open JPG files can open PNG.
Zamzar automatically converts each page in the PDF document into it’s own PNG picture file.
Now you can simply open Microsoft Paint (yes, all you need it Paint!) and choose File - Save As from the menu and choose JPEG from the drop down list of formats.
Do you always perform repeated tasks in Microsoft Word? Repeated tasks, if not automated are prone to human errors. If you perform a task repeatedly in Microsoft Word, you can automate the task by using a macro.
A macro is a series of Word commands and instructions that you group together as a single command to accomplish a task automatically. Since not all of us are programmers who can write code in Visual Basic, I will show you a way to create macros without even writing code.
First open up your Word document then click Tools > Macro > Record New Macro
According to the help document the macro recorder in Word acts like a tape recorder. It records your deliberate keystrokes and mouse button clicks … when you record a macro, you can use the mouse to click commands and options, but not to select text.
You must use the keyboard to record these actions. For example, you can use F8 to select text and press END to move the cursor to the end of the line. Remember that it records keystrokes and mouse clicks only.
When you record a macro it will ask for a macro name so assign it a descriptive macro name. After that click the OK button to record the macro.
Once you see the recording toolbar, enter the keystrokes that you want to record. In the example below I indented the first line of the paragraph(TAB) then I selected all (Control-A) then I applied the bold format(Control-B). After this I stopped the recording of macro by clicking the stop button.
The macro will be saved and you can run it by clicking the run macro command (or Alt-F8) from the Tools menu.
Before the macro run:

Now that you know how to make macros by recording keystrokes and mouse clicks, apply this tip on your own repeated tasks. This will increase your productivity and also you quality of work.
Want graphics in the header of an Excel spreadsheet? Sounds so easy to do, right? At first this task looks like a piece of cake, but after a while I realized that when I actually want to see the header on every page that I print, I ended up scratching my head.
My first try only printed the header on the first page but I wanted to have the header printed on all the pages. I will show you how to do this properly without pasting the header on every page break.
First open a new workbook in Excel then insert your choice of picture or image by clicking on the Insert Tab then click Picture
· Browse to the location of the picture or image and then click Insert.
· After the picture or image has been inserted, re size it to your preference.
· After resizing the picture or image, click on the Page Layout tab then click Print Titles.
· In the Page Setup window, choose the Sheet tab then click the icon of Rows to repeat at top. This is the most critical step since now we are telling Excel to print a repeated title on every page.
· A small arrow will appear. Use this arrow cursor to determine the location of the page header. Select the start and end rows of the graphic. In the example below I chose rows 1 to 4.
· You will see on the dialogue box $1:$4 because the image occupies cell 1 to 4. After selecting the cells occupied by the image hit enter then click ok on page setup window.
· Click Print > Print Preview to see the graphic header. The header will be displayed on every page of your worksheet.
· The figure below shows the example preview of each page in the workbook.
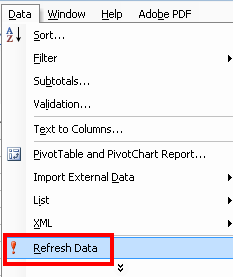
Excel users are usually required to import data from several sources. Web pages have become a common platform for corporate and non-corporate groups for presenting data. In this tutorial we will show you how to connect Excel to web pages that contains tables so you can get extract the tabular data from it.
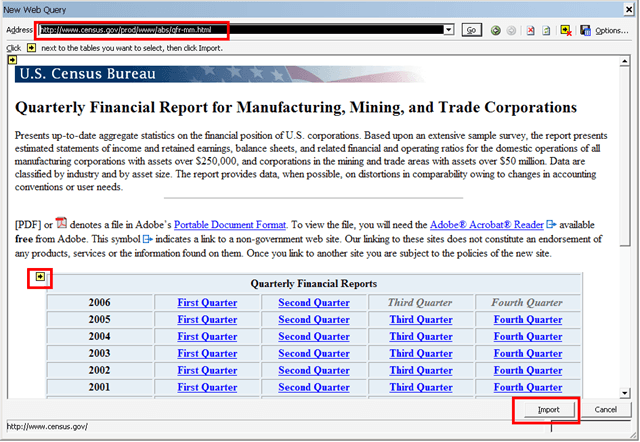
To import data from Excel, click the Data menu > Import External Data > New Web Query:
Enter the URL on the address bar then click go to display the page on the window. Click the arrow next to the table that you want to import then click the import button:
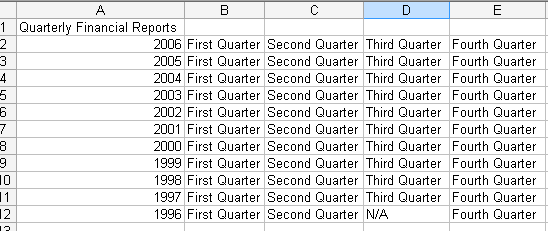
Enter the worksheet where you want the data to appear then click OK:
Presto! You’re done and should be able to see the tabular data appear on the sheet you specified above:
If you need to re-synch the data with the page contents, just click Data > Refresh Data:
This is way better than a simple copy-paste, isn’t it? Here are some benefits of using this method over copy-paste:
Office 2007 has a lot of improvements and, as a blogger, I particularly noticed its new ability to handle blog posts. In this post I will show you how to post and edit blog posts using Word 2007.
First, open Word 2007 then click New Document. Choose New blog post as a template:
On first use, it will ask you to setup your blog account. Enter the following information:Blog Post URL (i.e. this should be your own blog account’s URL, for example www.wordpress.com or www.blogger.com), user name and password. Check the remember password if you want this to be saved for your future blog posts. If you have many blog accounts, you can add more later.
If you entered the right information above, you should see the blog post editor like the one below:
After you are done with your blog post, you can post it to the host by clicking the publish buttons on the blog post menu:
You can choose from two options:
To edit an existing blog, click Open Existing:
It would query all of your posted blogs from your provider:
You can choose from any of your posted blogs then click OK to open that post for editing. You will only be able to see posts under your account.
For users with more than one blogging account, click manage accounts to enter the account manager window:
Click New then enter the blog provider:
Then enter the user credentials:
If you entered the right credentials, you should be able to post new blog posts and pull up an existing post.
I hope this post about Word 2007 helps you with your blogging. It is good to know that you can use a very familiar tool like Word for blog editing.
HKEY_LOCAL_MACHINE\SOFTWARE\Microsoft\Windows\CurrentVersion
Now look for a key in the right panel called ProgramFilesDir. You should see that the value is C:\Program Files.


If you like this blog,then link back to me.
This is what you will see.

Cyber Crunch : A Tech Blog © 2009 Template by TechnoTrends.
Please Register in TechnoTrends and post articles


